Content or WYSIWYG Editor
When editing a Page, Article or Product, the Content Editor can be found toward the bottom of the screen, below the settings section:
The "What You See Is What You Get" (WYSIWYG) editor allows users to create stylized HTML content without any knowledge of HTML markup script. The WYSIWYG editor allows you to create text, set styles, and insert a number of items including tables, images and hyperlinks. You will have access to the WYSIWYG editor any time you create or edit a Page, Article or Product.
What's in this article
- Working with Text
- Embedding Images & Other Media
- Displaying Data with Tables
- Editing the HTML
- Undoing Changes
Working with Text
The HTML editor is similar to most word processors such as Microsoft Word. The size, style and alignment of text can be defined using the controls along the top of the editor:

- Pre-defined heading styles.
- Font size.
- Bold, Italic & Colour.
- Text Alignment.
- Unordered/Ordered Lists.
- Increase/Decrease Indent.
- Insert/Edit Link.
Tip
Use heading styles (Heading 1, Heading 2, etc.) whenever possible instead of manually changing the text size/color. This will help you maintain a consistent style throughout your site.
Copying Text from Another Source
When copying text from a source such as Microsoft Word or another website, it is best to avoid copying the formatting and instead just copy the text. Once the text is copied, styles can be applied based on the site's CSS. This is because the source text's formatting may not be applied in the same way between different applications.
To paste text without formatting, click on the "Edit" menu and choose "Paste as Text". Formatting will not be carried over as long as that option is active.
Inserting a Hyperlink
Hyperlinks can be inserted by selecting some text or an image and clicking the "Insert/Edit Link" button at the top of the editor (#7 above):
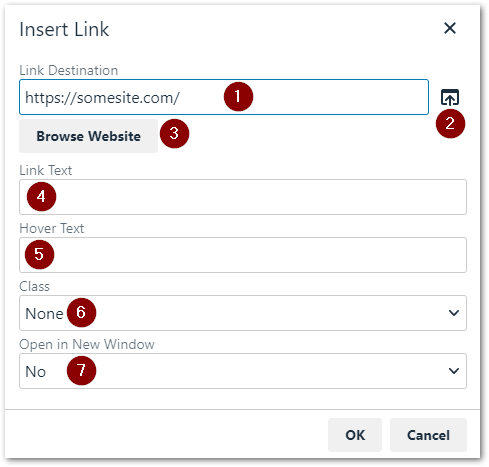
The following options are available when adding links:
- Enter a URL here to link to an external website.
- Click "Browse Files" to link to a file in the File & Image Manager.
- Click "Browse Website" to link to a Page, Article or Product on your site.
- The text for the link.
- The text that will be displayed when a user holds their mouse over the link.
- Select a class to make the link appear as a button.
- Select "Yes" if the link should open in a new window/tab. This is suggested for links to files or external websites.
Embedding Images & Other Media
Images and video can be added to the content area using the controls at the top of the editor:

- Insert/Edit image.
- Insert/Edit media (used for videos and other embedded content).
Adding Images
To add an image to the content area, it must first be uploaded via the File Manager. Once the image is uploaded it will be accessible to all Pages, Articles and Products. The following video demonstrates how to upload an image, insert it into a Page and change it's size:
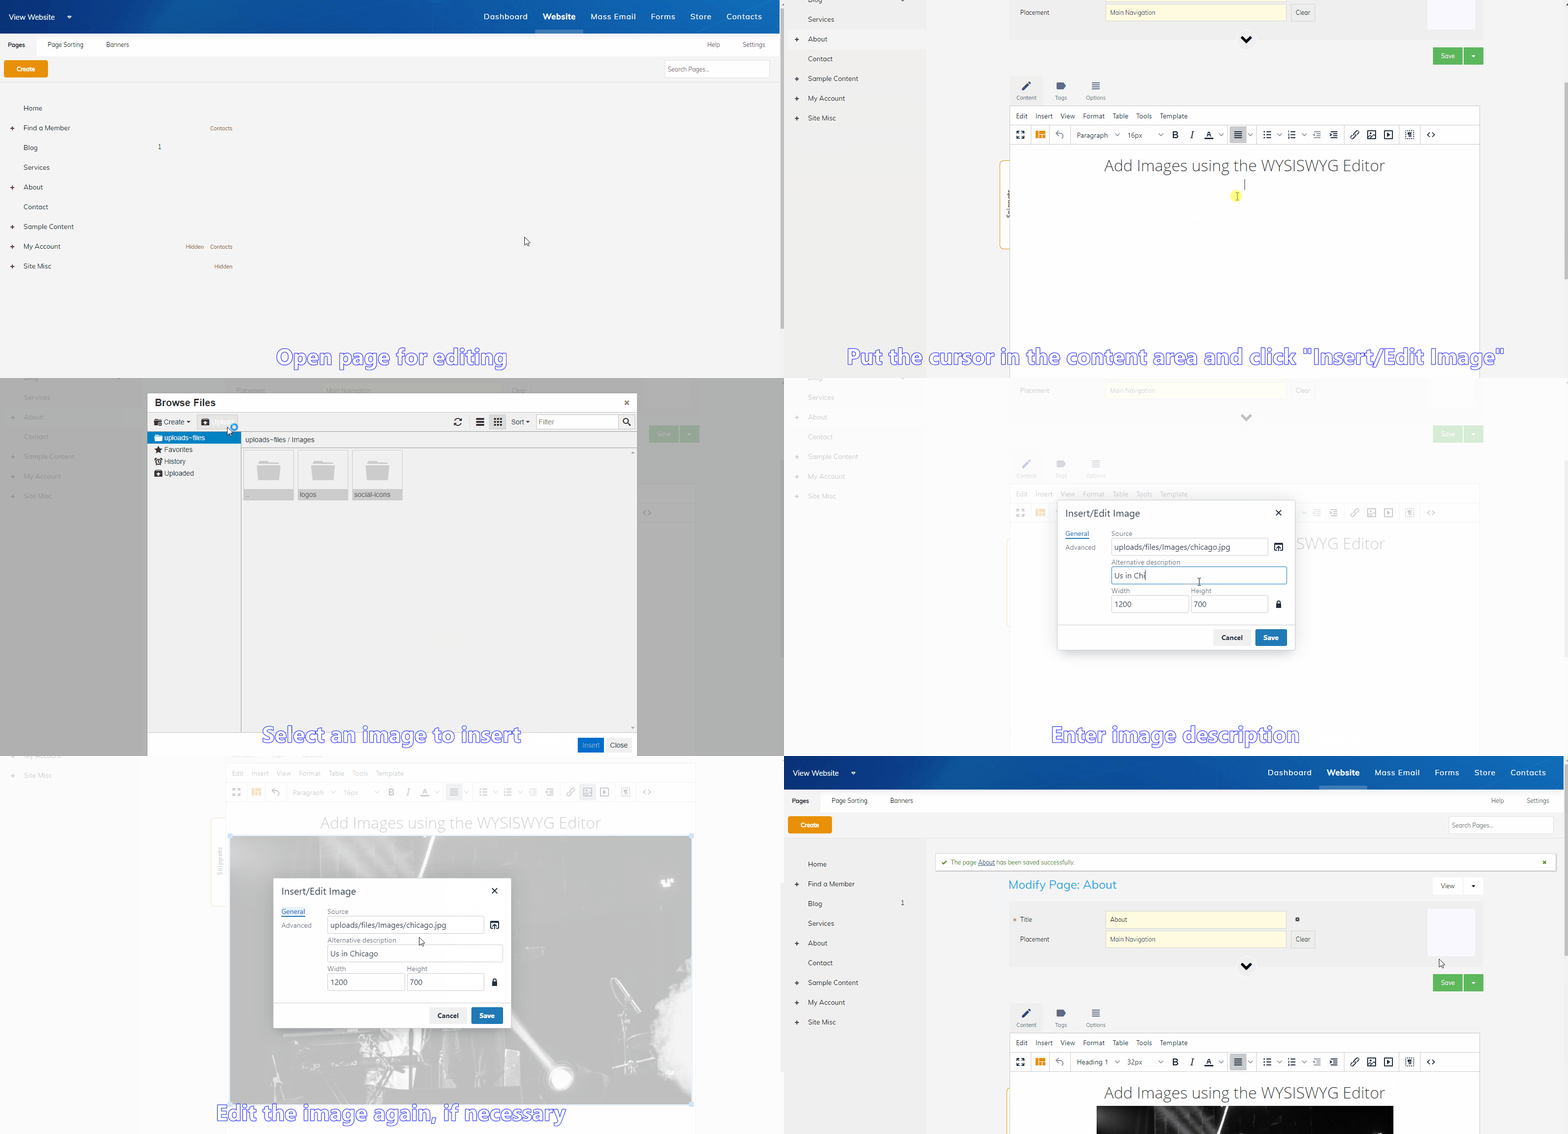
- Open a Page for editing.
- Place the cursor in the content area and click the "Insert/edit image" button at the top of the editor (#1 above).
- Click the folder icon next to "Source" to open the File Manager.
- Upload your image(s) or select an existing image, then click "Insert".
- Enter a description and change the dimensions if required. The "Constrain Proportions" checkbox will prevent the image from changing shape.
- Click "Ok" to insert the image.
- Select the image and click the "Insert/edit image" button again to make modifications.
Embedding Videos
Most online video hosting services provide "Embed Code" that can be used to play their videos on other websites. The following video will demonstrate how to embed a video from YouTube on your site:
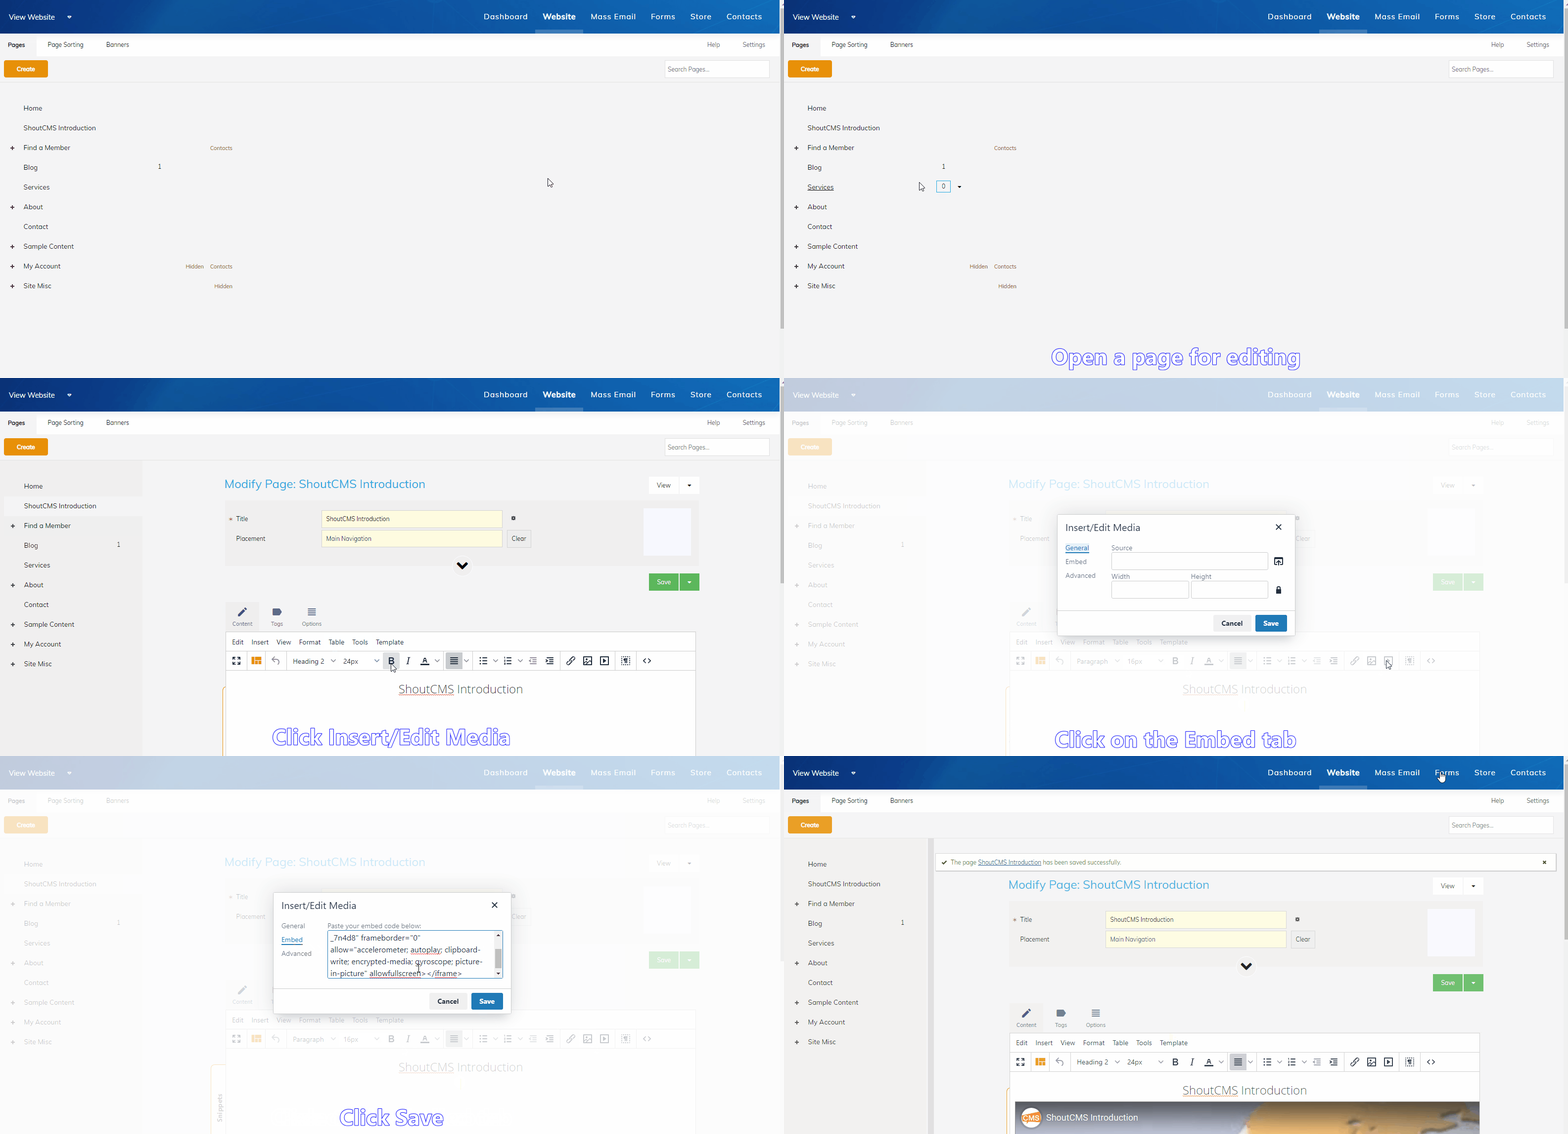
- On the YouTube website, right-click on your video and choose "Copy embed code".
- Navigate to your own website, log into the administrative console and open a Page for editing.
- In the editor, click "Insert/edit Media" (#2 above).
- Click on the "Embed" tab and paste the code that you copied in step 1, then click "Ok".
- Click "Save" to save the Page.
Tip
If you do not want the video to resize along with the window, paste a link to the video in the "Source" field instead of using the embed code.
Changing the Background
To change the background, right-click anywhere in the content area and select "Background" from the context menu. The following options are available:
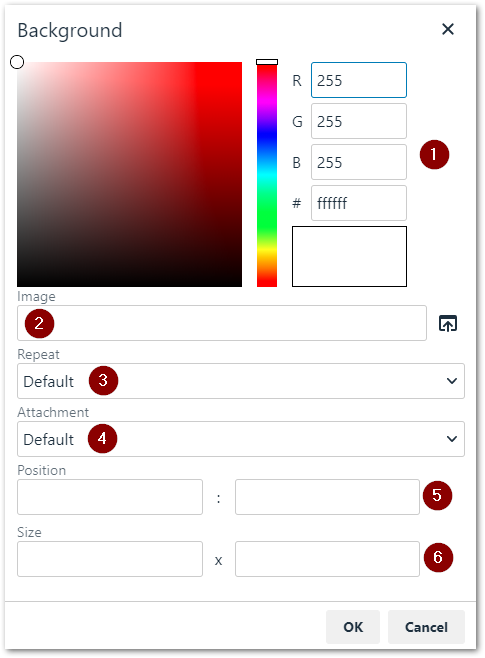
- Change the background color.
- Select a background image from the File Manager.
- Select how the background image repeats:
No Repeat: The image is only displayed once (default).
Repeat: The image is repeated both horizontally and vertically.
Repeat Horizontal: The image is repeated horizontally.
Repeat Vertical: The image is repeated vertically. - Select whether a background image is fixed or scrolls with the rest of the page:
Scrolls along with the element: The background scrolls when the viewer scrolls, as if the background is attached to the scroll bar. (default).
Fixed with regard to the viewport: The background will remain fixed while the viewer scrolls past it.
Scrolls along with the element's contents: The background scrolls when the viewer scrolls, as if the background is attached to the page contents. - Set the position of the background image (horizontal : vertical).
- Set the size of the background image (horizontal : vertical).
Displaying Data with Tables
Tables allow you to arrange data into rows and columns of cells. To add a table:
- Place the cursor in the content area, click the "Table" menu, then hover your mouse over the "Table" option.
- Select the number of rows/columns and click to add the table.
- Click on any cell to add content.
- Rows, columns and cells can be added and removed by right-clicking on the table and selecting the appropriate option.
Table Properties
Right-click on any table and choose "Table properties" to customize the table:
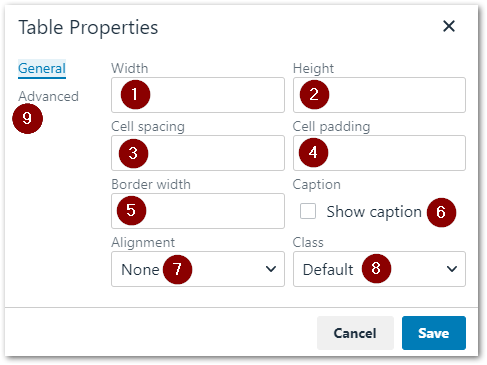
- The table's width, either in pixels (eg. 5px) or as a percentage of the available area (eg. 50%).
- The table's height, in pixels or as a percentage of the available area.
- The width between the cells, in pixels.
- The width between the edge of a cell and it's content.
- The width of the border, in pixels.
- If checked, the top row of the table will be used as it's caption/title.
- The table's alignment within it's container (has no effect if width is 100%).
- Apply a CSS class to the table (see Responsive Tables below).
- Edit advanced properties, including the table's "Style" attribute and it's background/border colors.
Cell Properties
Right click on any cell, select "Cell", then "Cell properties" to customize the cell:

- The cell's width, either in pixels (eg. 5px) or as a percentage of the table's width (eg. 50%).
- The cell's height, in pixels or as a percentage of the table's width.
- Switch between a regular cell or a header cell.
- For header cells, define whether the header applies to a row or a column.
- The cell's horizontal alignment.
- The cell's vertical alignment.
- Apply a CSS class to the cell.
- Edit advanced properties, including the cell's "Style" attribute and it's background/border colors.
Row Properties
Right click on any cell, select "Row", then "Row properties" to customize the row:

- Switch between header, body and footer rows.
- The row's horizontal alignment.
- The row's height either in pixels (eg. 5px) or as a percentage of the table's height (eg. 50%).
- Edit advanced properties, including the row's "Style" attribute and it's background/border colors.
Responsive Tables
Tables can be configured to resize themselves along with their container:
- Right-click on any table and choose "Table properties".
- Enter 100% for the width.
- Select "Responsive" as the class, then click "Ok".
Editing the HTML
Users experienced with HTML may prefer to edit the underlying code directly instead of working through the editor. There are also situations where you may need to add HTML tags, such as iFrames, that are not directly supported by the editor. To edit the HTML code, click the "Source Code" button at the top of the editor:

Undoing Changes
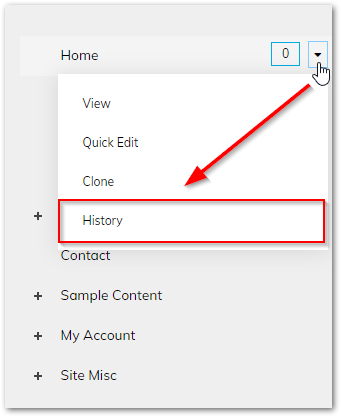
ShoutCMS also retains a copy of each Page every time it is saved. To restore the previous version of a Page, click "History" under the "View" dropdown menu located at the top-right of the "Modify Page" screen:
For smaller mistakes, there are also undo/redo commands under the "Edit" menu, or you can use the CTRL+Z / CTRL+Y keyboard shortcuts (Command+Z or Command+Shift+Z on Mac).
