Importing Products
The Product Import feature allows you to create Products based on data from a CSV spreadsheet or XML file. If you want to duplicate a large number Products from another ShoutCMS installation, or another Content Management System that allows exporting Product data, this feature may save a great deal of time.
What's in this article
- Sample Import Files
- Limitations of the Import Feature
- Selecting a File Format
- Preparing the Import
- Step 1 - Upload your Data
- Step 2 - Map your CSV file
- Step 3 - Configure the Import Process
- Step 4 - Verify your Import
- Step 5 - Complete your Import
- Undoing your Changes
The Product import process involves the following:
- Deciding on a file format (CSV or XML). There are advantages and disadvantages to each format which are described below.
- Preparing your Product data (and images, if required).
- Uploading the data to ShoutCMS.
- Confirming field mappings & selecting import options.
- Completing the import and reviewing the new Products.
- Undoing the import, if necessary.
Sample Import Files
Examples of the Product and Product Image import files are below:
Limitations of the Import Feature
The import is currently restricted to 1,500 products per import. If more than 1,500 products are to be imported, they must be split into separate files. The following table describes what can and cannot be imported:
| What can be imported? | What can't be imported? |
|---|---|
|
|
Note
HTML tags cannot be included for any field unless explicitly stated below.
Basic Product Fields
These fields can be imported using either the CSV or the XML file formats:
| Field Name | Description |
|---|---|
| Title | Up to 255 characters long. |
| Sku | Up to 50 characters long. Must match image filename when using a CSV file. |
| URL | Up to 255 characters long. May only contain alphanumeric characters and dashes. |
| Summary | Up to 255 characters long. |
| Description | May contain HTML. |
| Cost (CAD) | Do not include dollar symbol. |
| Price (CAD) | Do not include dollar symbol. |
| Width (cm) | Do not include units. Centimetres are implied. |
| Height (cm) | Do not include units. Centimetres are implied. |
| Length (cm) | Do not include units. Centimetres are implied. |
| Weight (kg) | Do not include units. Kilograms are implied. |
| Category | Multiple Category Groups may be separated by the | character. (eg. "Bikes|Mountain Bikes") |
Extended Product Fields (XML only)
These fields can only be imported using the XML file format. Please review the XML sample file as well, since the following field descriptions are incomplete without knowing how to correctly nest the XML tags:
| Field | XML Tag | Description |
|---|---|---|
| Product Specific | ||
| Stock | <stock> | The item's current stock. |
| Stock Threshold Minimum | <stock_threshold_min> | The number of of items in stock before the system warns that it's time to re-supply. |
| Stock Threshold Maximum | <stock_threshold_max> | The stock when the system warns you that you're overstocked. |
| Purchase Message Subject | <purchase_msg_subj> | The subject line for the product's post-purchase e-mail. |
| Purchase Message Body | <purchase_msg> | The body of the product's post-purchase e-mail. |
| Purchase Notification | <purhcase_notification> | The e-mail address that gets notified when this product is purchased. Only one e-mail is allowed. |
| Product Options | ||
| Product Option Name | <name> | The name of the product option. The maximum length is 50 characters. |
| Product Option Field Type | <field_type> | The type of field, (textbox, drop down list, etc.). Accepted values: 1 - Short Text 3 - Drop-down select 10 - Price entry 11 - Calendar |
| Product Sub-Options | ||
| Sub Option Label | <label> | The label for the sub option. The maximum length is 50 characters. |
| Sub Option Price Modifier | <price_mod> | The price modifier of the field, may be a positive or negative decimal number. |
| Sales | ||
| Sale Name | <name> | The name of the Sale. The maximum length is 50 characters. |
| Coupon Code | <coupon_code> | The coupon code for the sale. The maximum length is 50 characters. |
| Start Time | <start_time> | The start date of the sale. Optional, use only if you want timed sales. The value should be specified as a unix timestamp. |
| End Time | <end_time> | The end date of the sale. Optional, use only if you want timed sales. The value should be specified as a unix timestamp. |
| Minimum Quantity | <qty_min> | The minimum quantity of products required to trigger the sale. |
| Maximum Quantity | <qty_max> | The maximum quantity of products allowed before the sale is invalid. |
| Gallery Images | ||
| This section is optional. If not specified, the importer will try to find a filename matching the SKU. It is only necessary to use this if you want to import titles or captions; or if your images do not follow our naming scheme. See the section on Preparing the Import for more information. | ||
| Filename | <filename> | The filename for the corresponding image. Required if you specify images explicitly. |
| Title | <title> | The title of the image. The maximum length is 255 characters. |
| Caption | <caption> | The caption of the image. |
Selecting a File Format
Generally, you will want to use the CSV format as it is much easier to work with and is compatible with popular spreadsheet applications such as Microsoft Excel. An XML file will have to be used if you are planning to import any of the following:
- Products that include Sales & Promotions.
- Products with more than 10 Configurable Options.
- Products with sub-options.
- Images with captions and titles.
- Stock/Inventory data.
- Products that include any of the Extended Product Fields.
Preparing the Import
To begin importing Products, in the Administration Console, hover your mouse over the top navigation icon titled "Store", then click "Inventory". On the next screen, click the orange button labeled "Import Products":

Tip
Before continuing, refer to the sample import files (CSV or XML) and the sample image archive. These can be used as a template for your own import.
Preparing the Image Archive
To include images in your import, you will need to upload the optional image archive file. This is a zip file containing your images named according to the SKU of the Product. If your Products do not typically have SKUs, you will need to create dummy SKUs for the sake of importing images. Refer to the sample image archive file for an example of how to organize the images.
- For a single image: If your Product SKU is SKU-BIX100, then your Product image should be named SKU-BIX100.jpg or SKU-BIX100.png.
- For multiple images: If your product SKU is SKU-BIX100 and you want to import 3 images, name your images SKU-BIX100~1.jpg, SKU-BIX100~2.jpg, SKU-BIX100~3.jpg and so on. Each additional image is separated by the tilde character (~) and a number. Images are sorted according to the number specified.
Note
Images should be in JPG or PNG format.
Preparing a CSV File
Download the sample file to use as a guide when creating your own import.
Product Options
The CSV importer uses the heading of your Product Option column as the title. In the example CSV file, one of the headings is "Select a Color". The values in this column represent the Product Option choices for a given product. The type of field that is used for the option (textbox, dropdown, etc.) can be selected in Step 2 of the import process.
By default, if you map a Product Option in Step 2, all Products in your CSV file will be created with that option. If you have a large variety of Product Option among your Products you may need to break your import into multiple files where Products with similar options are imported at the same time. Another option is to use the special value IGNORE in the column for the option. This will cause the importer to ignore importing a particular option for a given product.
If using the drop-down select, multiple select options may be imported if they are separated by the vertical bar (|) character. For example, if your heading is "Select a Color" and one of your products has Chrome | Black +15 | Blue -15 | Green +20 as it's column value, the importer will create 4 drop-down options. An optional price modifier for each option is denoted with the +15 or -15. The +/- is required for the importer to recognize the price modifier.
Categories
The importer will try to match existing Category Groups based on the category title. Be sure to create your categories before running the import.
For CSV imports, multiple categories may be specified by separating them with the vertical bar (|) character.
Preparing an XML File
XML files need to be structured in a specific manner and are best generated by a developer. If you have specialized import needs you may need to work with a third-party to generate the XML file. You'll want to provide our them with our format specification and with access to your website so that they can upload and validate their work.
Step 1 - Upload your Data
Select an image archive (optional), and a CSV or XML file to upload:
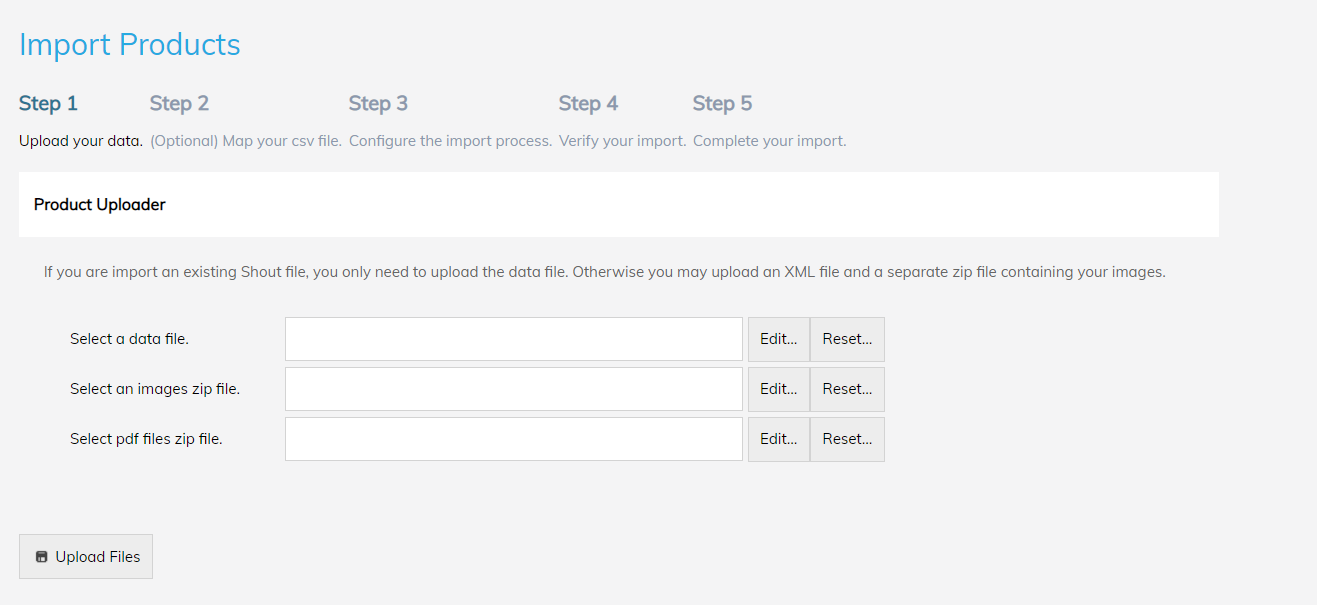
Once you have selected the files, click "Upload Files" to move on to the next step.
Step 2 - Map your CSV file
If you are using the CSV file format, this step involves mapping the columns in your file to the Product fields. The importer will attempt to map the fields automatically and, if successful, will highlight them in green. Product Options must be configured manually:

For each field (#1) that you wish to import, select a column from your spreadsheet (#2). The sample data (#3) is there to help you confirm you have selected the correct fields.
Once you have confirmed the mappings, click "Confirm Mappings" to move on to the next step.
Step 3 - Configure the Import Process
Configure the behaviour of the uploader:
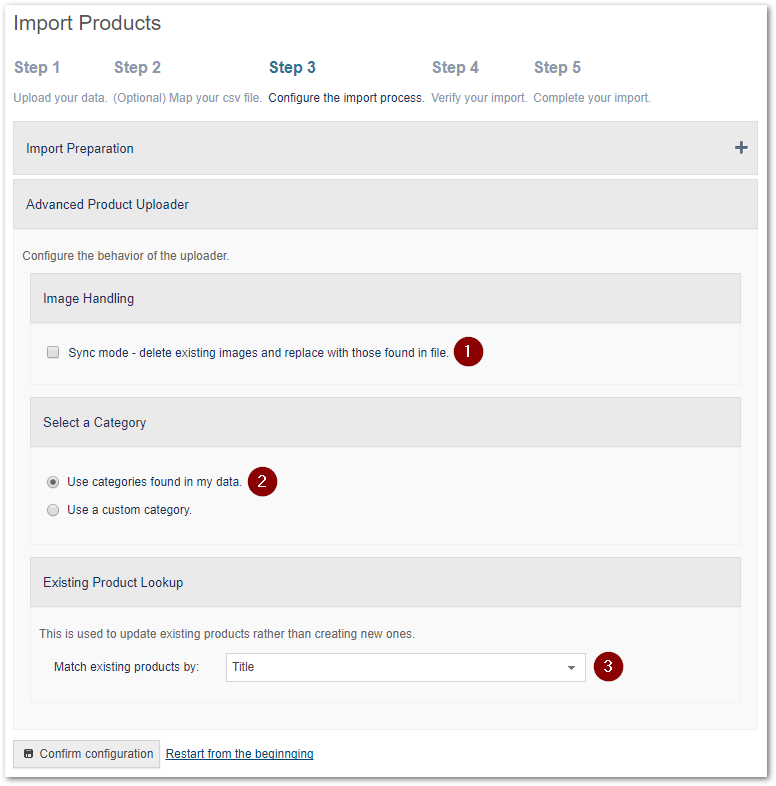
- Sync mode: If this is checked, any existing images will be replaced with the uploaded images.
- Category Mode: Select a specific Category Group for the new Products to be added to, or use the groups defined in the uploaded file.
- Match Mode: Configure how existing Products are detected - either by comparing titles, or SKUs.
Once you have confirmed the configuration, click "Confirm Configuration" to move on to the next step.
Step 4 - Verify your Import
This is the last chance to verify that the fields were imported correctly before committing the changes to the database:
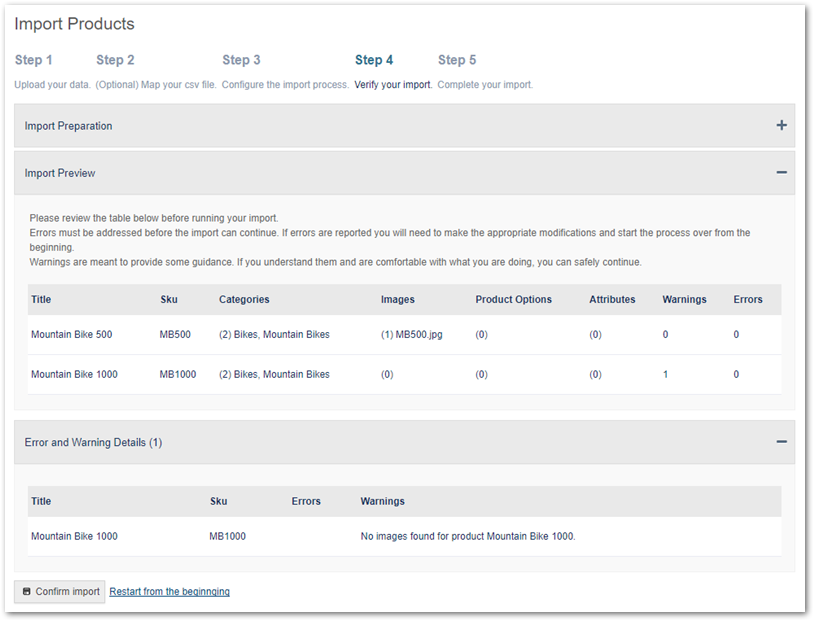
Errors must be addressed before the import can continue. If errors are reported you will need to make the appropriate modifications and start the process over from the beginning. Warnings are meant to provide some guidance. If you understand them and are comfortable with what you are doing, you can safely continue.
Click "Confirm Import" to move on to the next step.
Step 5 - Complete your Import
After the import has completed, you'll be provided with a summary of the Products that were updated/created:
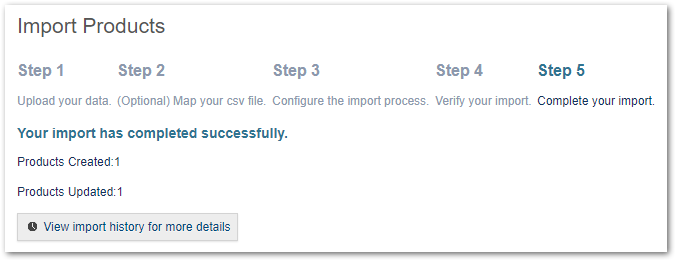
Click the button labeled "View import history for more details" to view a list of the last 15 imports. If you have made a mistake, you can undo the imports on that screen.
Undoing your Changes
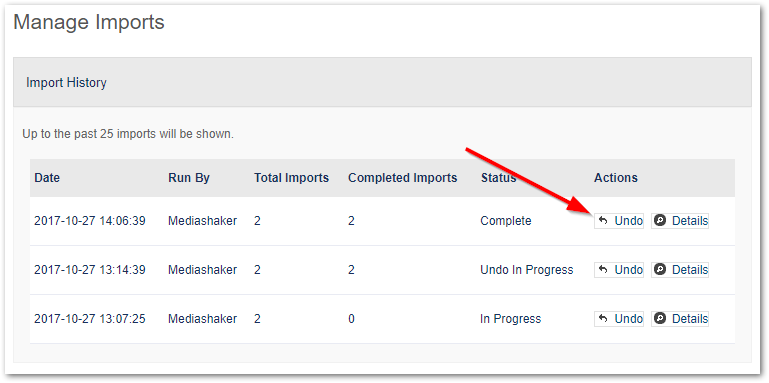
Product imports can be undone on the "Manage Imports" screen. From the Administration Console, hover your mouse over the top navigation icon titled "Store", then click "Inventory". On the next screen, click the down-arrow next to "Import Products" and select "Manage Imported Products":

On the next screen, click "Undo" next to any of your previous 15 imports to remove those Products:
